News » blogs
-
How To Hand Wax Your Motorcycle
How To Hand Wax Your Motorcycle by KingsMotorcycleFairings.com

Before we dive into “how to wax your motorcycle”, our team at KingsMotorcycleFairings.com wanted to share with our readers what makes waxing your bike so important. Well, waxing your motorcycle is one of the most cost efficient ways to keep your sport bike in tip-top shape! It's easy to assume waxing is done just for aesthetics, however a layer of protective wax can significantly help keep your bike both dirt and dust free while enhancing the natural shine of your fairings! In addition to waxing being very beneficial for your bike, it can also be a fast and easy process once you get the hang of it.
How to prepare
Prior to waxing, you’ll want to ensure your bike is freshly washed and rid of any dirt, dust and debris. If you’re new to hand washing your motorcycle, or simply looking for some pro tips, please visit our previous blog article on “How To Wash Your Motorcycle”. Properly washing your motorcycle prior to applying the wax is crucial, because it will help reduce the chances of scratching your bike when applying the wax. Pro Tip: You’ll want to move your bike into a shady area, it’s never a good idea to wax in direct sunlight. The sun can cause the wax to essentially bake onto your bike making the wax very difficult to spread effectively.
What you'll need
- Microfiber cloths
- Motorcycle wax
- Microfiber applicator pad (this helps evenly distribute the wax for a better finish and typically comes prepackaged with the motorcycle wax you purchase)
It’s time to wax
Ok, now it is time to wax your freshly washed bike. First, grab one of your clean microfiber cloths and lightly wipe away any dust or dirt that may have settled. Next, grab your microfiber applicator pad and your motorcycle wax. Apply a quarter size amount of wax directly to the applicator pad. Trust us, a little wax can go a long way and adding too much wax at once can make the process less manageable and messy (plus, you can always add more wax during the process if you feel it is necessary). Now when applying the wax, focus on one area at a time and lightly apply the wax with the pad in a circular motion. At first glance, you’ll likely notice a dull and cloudy residue being left behind, this is completely normal and all apart of the process as the wax thins out and dries. Once finished applying the wax across all of your painted motorcycle fairing pieces, simply let the wax sit and finish drying fully in a shaded area before starting the next & final step.
Final step
You're almost done, congrats! Once the wax on your motorcycle has dried, take a clean microfiber cloth and start to thoroughly wipe the excess residual wax away. During this process you’ll start to notice the dull residue slowly disappearing, with some spots possibly needing a little extra elbow grease depending on the wax and how much was applied. After you have finished wiping off the wax, take a step back and examine your bike for any wax marks, chunks or streaks you may have missed. If you discover a few dry areas on your bike that could have used a little extra wax, you can always go back and repeat the waxing process in that specific fairing section. That's it. Simple enough, right? You’re now ready to take your bike out on the road and show off the freshness!

The team here at KingsMotorcycleFairings.com hope that you found this article helpful. If you have extra time, we’d love for you to visit our online store for the largest selection of quality Motorcycle Fairing Kits, Helmets, Gear & Accessories! -
How To Wash Your Motorcycle
How To Wash Your Motorcycle by KingsMotorcycleFairings.com
When you take your motorcycle out for a ride two things are bound to happen, a good time and the accumulation of dirt, dust, bugs, salt, sand, grass and gum all hitching a ride onto your bike. It's annoying, but we have all been there! As most motorcycle riders know, cleaning your motorcycle is not just for aesthetics, but it significantly helps maintain the quality of your bikes body and mechanical parts by fighting off potential corrosive substances from irreversible damage.
That being said, the team at KingsMotorcycleFairings.com is here to help provide recommendations on the best ways to clean your motorcycle and maintain its looks, performance and value! Are you ready? We sure are….
Prepare Your Motorcycle
Before you start, it's important to note you should not be washing your bike right after a ride. You’ll want to make sure your bike temperature is cool to prevent thermal shock from occurring. Also, make sure that you select a shaded area to wash your motorcycle (or at least an area out of direct sunlight). Why? Because the sun can cause the soap or bike cleaner you are using to dry faster, leaving behind streak residue, thus making your washing experience more difficult and time consuming than necessary. Pro Tip: You’ll want to plug those exhaust holes! If you don’t have plugs, you can use a simple rag or a rubber glove you have at home. It's good to get into the habit of doing this before you wash your bike every time, the less water pooling in your exhaust the better.
Gather Your Cleaning Supplies
- Soap / Motorcycle Cleaner- You can use a pre-formulated bike wash cleaner or simply Dawn dish soap (diluted). Pro Tip: avoid using general household cleaners on your bike (other than Dawn of course).
- Sponges- Sponges are great for gently removing dirt and grime from your bike without scratching it. Pro Tip: Rinse your motorcycle first and ensure all surfaces are wet prior to wiping with a sponge, cloth or towel. Also, avoid keeping any sponges, cloth's or towels from lying on the ground. Any one of these materials can easily pick up sand and will significantly increase the odds of scratching your motorcycle the moment you wipe the sponge, cloth or towel on your motorcycle's surface.
- Two Buckets- Yes, two buckets! One bucket should be used specifically for containing hot, clean, soapy water and the second bucket should contain fresh water to help rinse your sponge free from all of the dirt sediments periodically. Pro Tip: Similar to not leaving sponges, cloth's & towels on the ground, you also want to avoid these materials from sitting in a dirty bucket before reusing (which would surely scratch your motorcycle surfaces). The goal is to always have a clean sponge, cloth or towel for every time you wipe your motorcycle.
- Hand Towel- These are one of the best towels to use because they are the perfect size to get the dirty job handled, while not being too large where it would drag onto the ground and collect sand. Also, rememeber to always dampen your clean hand towel before wiping your bike to gently remove the dust and dirt off from your motorcycle's fairing surfaces. Pro Tip: When wiping any motorcycle surface (fairings, windscreen, headlights, rims, etc.), remember not to apply too much pressure, regardless of how stubborn a chunk of dirt may be. If necessary, shower hot soapy water on top of a caked-on piece of dirt and wait for the grease-fighting properties of the soap to slowly disintegrate the dirt from your motorcycle's surface. If the dirt is still caked-on, we recommend laying a hot soapy hand towel on top of the dirty area and let it rest for 5 minutes to help loosen the dirt away.
- Microfiber Cloth- Microfiber towels and cloths are one of the best types of materials to use on your bikes scratch prone surfaces. You can use a microfiber cloth to wash your motorcycle and then use another one when drying off your motorcycle.
- Spray Bottle- A spray bottle is optional, but recommended. It will be used to properly distribute the soap cleaner across your motorcycle in a controlled and targeted manner. The spray bottle is of course to be used in tandem with a hose, your buckets, sponges, cloths and towels!

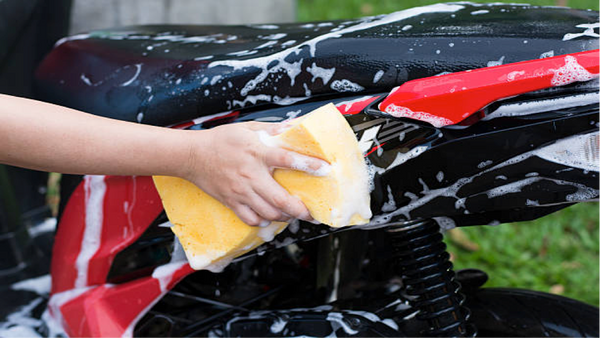
It’s Washing Time
Start off by showering your bike with water, go over it multiple times to try to take off as much dirt as you can. The less you physically have to touch your bike, the less chances you have of scratching it. Next, you’ll want to grab your spray bottle full of hot, diluted motorcycle soap cleaner or Dawn dish soap. Then begin to spray the soap cleaner all over your motorcycle and let it sit for a couple of minutes to allow any stubborn dirt, grease, grime and gunk to loosen up. Once you feel like you have allowed enough time for the dirt spots to loosen, thoroughly rinse your bike again with water. Now, it's finally time for the sponge. Dip your clean sponge in the hot bucket of water which also contains your soap mixture. Carefully and gently scrub your bike from top to bottom. If the sponge you are using gets dirty in the process, it’s important to rinse it off in the second bucket we mentioned before (or use an entirely new and fresh sponge all together). Remember, scrubbing your bike with a dirty sponge can quickly lead to scratches. Once you are done scrubbing, give your motorcycle a final and thorough fresh water rinse. Pro Tip: Avoid cleaning your bike's chain and brakes to prevent unnecessary stripping of the lubricants that help them function properly!

Drying Your Motorcycle
You’ll want to start drying your motorcycle fairly quickly after the final rinse to avoid water marks and streaking. Simply grab the microfiber towel and get to drying! If you’re feeling ambitious and have a leaf blower at home, feel free to power it up and air dry your motorcycle for a more hands off approach. Once your motorcycle is dried, now would be a good time to re-lube your bike chain. Lastly if you're feeling extra ambitious, you can wax your motorcycle fairings to give it the final sparkle and layer of protection it needs before heading back out onto the road!
The team here at KingsMotorcycleFairings.com hope that you found this article helpful. If you have extra time, we’d love for you to visit our online store for the largest selection of Motorcycle Fairing Kits, Helmets, Gear & Accessories!
-
6 Tips For Riding Your Motorcycle In The Rain
6 Tips For Riding Your Motorcycle In The Rain by KingsMotorcycleFairings.com

If there’s one thing all motorcyclists have in common, it’s our pure love and passion for riding. Sometimes, this passion convinces us to want to ride so badly, that we’re willing to drive in subpar conditions, such as in the rain. If you’re guilty of wanting to ride despite poor weather or you simply find yourself caught in an unexpected rainfall, we want to help ensure you remain safe by providing you with a few tips.
Our team here at KingsMotorcycleFairings.com has compiled a list of 6 tips for you below for the next time you and your motorcycle are cruising on wet, slick and dangerous roads!
- 1.) Keep calm and avoid distractions
It’s always important to avoid distractions when riding on your bike, especially when the weather is not on your side. Remember to stay hyper focused by keeping your eyes on the road while staying calm and present.
- 2.) Avoid any sudden movements
This one goes along with keeping calm. If you're too tense and riding your bike with a death grip, the likelihood of any movement you make will be overly exaggerated, thus making it more dangerous for you the rider. Also avoid sudden acceleration, braking and swerving to help keep control of your bike at all times.
- 3.) Ride slowly
We know riding at slower speeds on your bike is not ideal or fun, however rain (regardless of intensity) will significantly reduce visibility for you and others on the road. Riding slowly and staying in your optimal lane will help increase awareness to other vehicles by allowing them to know where you are on the road and to allow you more space and reaction time.
- 4.) Stay away from puddles
Avoid puddles like the plague! They might look fun and maybe a little tempting to make a splash in, however puddles often equal potholes and potholes often equal an accident, a damaged motorcycle and personal injury. If a puddle is visible, give yourself enough lead time to pick a line that avoids the puddle entirely. If a puddle isn’t noticed until the last minute, calmly decelerate instead of swerving and slowly drive through the puddle to help decrease your odds of any rim damage or any accidental crashes.
- 5.) Turn those headlights on
When it comes to the rain, visibility can be dangerously low. That's why it is very important to ensure your headlights are fully on for increased visibility for not only yourself, but in addition to allowing the surrounding vehicles to know your whereabouts on the road.
- 6.) Wear your gear
We encourage all riders and passengers to be fully geared up for maximum protection regardless of whether it's a hot, sunny day or a cold, rainy evening. Helmets, jackets, boots, gloves and any other protective gear is always worth wearing!

Please keep these tips top of mind, so you’re always prepared for riding in any weather condition. Remain calm, be confident, stay safe and enjoy your ride.
The team here at KingsMotorcycleFairings.com hope that you found this article helpful. If you have extra time, we’d love for you to visit our online store for the largest selection of Motorcycle Fairing Kits, Helmets, Gear & Accessories!

-
What Is The Purpose Of Motorcycle Fairings?
What Is The Purpose Of Motorcycle Fairings? Whether you are riding a Honda, Ducati, Kawasaki, BMW, Yamaha, Triumph, Aprilia or a Suzuki motorcycle, fairings can in fact make a significant difference in how your bike will perform and look. -
How Often Should I Change My Motorcycle Oil?
How Often Should I Change My Motorcycle Oil? By KingsMotorcycleFairings.com
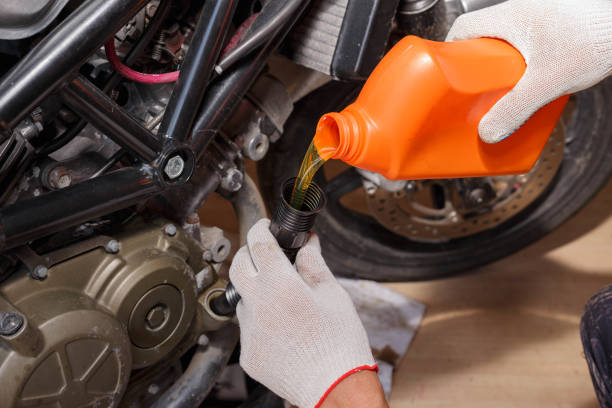
If you’re an experienced rider or just starting out, the question of “how often should I change my motorcycle oil” is a frequent one. Changing your motorcycle's oil is just as essential as changing the oil of your automobile. But lets face it, life gets busy and it’s very easy to forget something like changing your oil! However, the performance and longevity of your motorcycle depends on it.
Frequent oil changes assist in the cleaning and lubrication of your motorcycle's critical internal components, which helps protect it from wear and strain. Our team at KingsMotorcycleFairings.com wants to emphasize the importance of consulting your owner's handbook before changing or adding oil to your motorcycle. Also, if you're not confident in changing your motorcycle oil yourself, please bring it into a professional shop for servicing.
Ok, so just how often should you change your motorcycle oil?
When answering this question there are many different factors that should be considered...
- What type of oil does your bike take?
- How often do you ride?
- Are you riding at fast speeds?
The type of oil your bike needs plays a major role in determining how often it will need to be changed.
- If you use Synthetic oil, it should be replaced every 7,000 to 10,000 miles, or at the very least once a year.
- If you use Semi-synthetic oil, it should be replaced every 5,000 to 6,000 miles, or at the very least once a year.
- If you use Mineral oil, it should be replaced every 2,000 to 3,000 miles, or at least once a year. Some experts may recommend a minimum of twice a year.
If you feel your motorcycle is not running/performing as smoothly as it had previously (while not yet riding above the recommended miles for an oil change), then we strongly recommend you check the integrity of the oil to determine if it is dirty oil or simply low in volume.
Another important thing to note is that you may need to replace your motorcycle oil more frequently if you are not regularly driving your motorcycle. Whether you're driving a Honda, Suzuki, Kawasaki, Yamaha, Aprilia, Triumph, BMW, Ducati or similar, then your motorcycle needs to be regularly driven (not idling) to help burn off excess moisture that has been accumulated by the oil to help prevent oil degradation and oil corrosion. If you are unable to ride your motorcycle for more than 30 minutes each week, it is recommended that you change the oil every 4 months.

The team here at KingsMotorcycleFairings.com hope that you found this article helpful. If you have extra time, we’d love for you to visit our online store for the largest selection of Motorcycle Fairing Kits, Helmets, Gear & Accessories!