News » how to
-
How to Pop a Wheelie on a Motorcycle
How to Pop a Wheelie on a Motorcycle by KingsMotorcycleFairings.com

You know how to ride a motorcycle, but do you know how to pop a wheelie? A wheelie is one of the most famous bike stunts to execute for riders and for spectators to witness. To some riders, performing stunts on a motorcycle can be extremely intimidating (which it should be, since they can be dangerous). However, with proper guidance and control you can learn how to perfect the skill of a wheelie over time in a safe way. Now, there are a number of different variations and techniques to performing a wheelie, so to start, our team at Kings Motorcycle Fairings highly recommends learning how to first master the most basic, “power wheelie”!
Before you start
Motorcycle stunts, including the power wheelie, can be very dangerous, so we highly recommend learning this stunt only if you are already an advanced or experienced motorcycle rider and by doing so in a secluded and safe area. We also want to emphasize the importance of wearing a motorcycle helmet & protective gear at all times when riding, but especially when learning a new skill on your sport bike. In addition to the regular protective gear you consistly wear on the street, it certainly wouldn't hurt to be extra precautious by adding a little extra gear (such as knee pads, elbow pads and even ankle pads). Just like learning to ride a bicycle for the first time as a kid, it is likely that you will be falling frequently before you get the hang of it.
Step 1
Put it in 1st gear! Power wheelies are much easier when starting off in first gear, it's all about using acceleration to assist the bike in pulling the front wheel upward. The main objective to learning how to perform a wheelie is finding the right speed. We recommend starting the learning process by using speeds no higher than 10-15 mph. Going too slow can result in not having enough force to pull your front wheel upward. Going too fast can result in loss of control and can quickly put you in an unsafe situation. The key is to find a constant speed in-between 10-15 mph that will allow you to successfully find your balance point. Once you have found a good speed, you are ready to take on step 2!
Step 2
When you are ready, drop your speed and then open up the throttle and accelerate! This will help give you more power and a kick when you hit the gas. As you are doing this, pull the front wheel of your bike upward. If you feel as if you are going too far back, slightly hit the back brake to prevent yourself from flipping backwards. When you hit the rear brake, keep in mind that this action will cause your front wheel to come back down, so it's very important to land your front wheel as straight as possible. If your front wheel does not land straight or you land too suddenly, it can cause your bike to shake on impact resulting in a crash and possibly injuries.
Step 3
This step is about maintaining your balance during the power wheelie. When your front wheel is in the air it is important to find your balance point in order to be in the wheelie for a longer period of time. Lean back on the rear side of the bike, making sure the balance point of you and your bike is in the center. Pro Tip: Any sudden tipping forward or backward can interrupt your point of balance and result in the bike tipping over and damaging your motorcycle fairings (breathe & remain calm).
Step 4
When you are ready to end the wheelie, use your rear brake (like we mentioned earlier) to bring the front end of your sport bike back down to the pavement. Again, keep in mind that you will want to hit the brake slowly to ease your way back down. When you hit the brake too hard it can cause you to lose control resulting in you and your bike falling over. Pro Tip: You can slightly increase your throttle as the front end is coming down to help balance out your movements.
Lastly, motorcycle wheelies are an extremely fun but dangerous aspect of motorcycle riding. It is very important that you remember to be extremely aware of any other vehicles on the road and be personally safe by wearing your motorcycle helmet & protective gear. Kings highly recommends that you always practice in a secluded area free from other vehicles!
The team here at KingsMotorcycleFairings.com hope that you found this article helpful. If you have extra time, we’d love for you to visit our online store for the largest selection of quality Motorcycle Fairing Kits, Helmets, Gear & Accessories!
-
How To Wash Your Motorcycle
How To Wash Your Motorcycle by KingsMotorcycleFairings.com
When you take your motorcycle out for a ride two things are bound to happen, a good time and the accumulation of dirt, dust, bugs, salt, sand, grass and gum all hitching a ride onto your bike. It's annoying, but we have all been there! As most motorcycle riders know, cleaning your motorcycle is not just for aesthetics, but it significantly helps maintain the quality of your bikes body and mechanical parts by fighting off potential corrosive substances from irreversible damage.
That being said, the team at KingsMotorcycleFairings.com is here to help provide recommendations on the best ways to clean your motorcycle and maintain its looks, performance and value! Are you ready? We sure are….
Prepare Your Motorcycle
Before you start, it's important to note you should not be washing your bike right after a ride. You’ll want to make sure your bike temperature is cool to prevent thermal shock from occurring. Also, make sure that you select a shaded area to wash your motorcycle (or at least an area out of direct sunlight). Why? Because the sun can cause the soap or bike cleaner you are using to dry faster, leaving behind streak residue, thus making your washing experience more difficult and time consuming than necessary. Pro Tip: You’ll want to plug those exhaust holes! If you don’t have plugs, you can use a simple rag or a rubber glove you have at home. It's good to get into the habit of doing this before you wash your bike every time, the less water pooling in your exhaust the better.
Gather Your Cleaning Supplies
- Soap / Motorcycle Cleaner- You can use a pre-formulated bike wash cleaner or simply Dawn dish soap (diluted). Pro Tip: avoid using general household cleaners on your bike (other than Dawn of course).
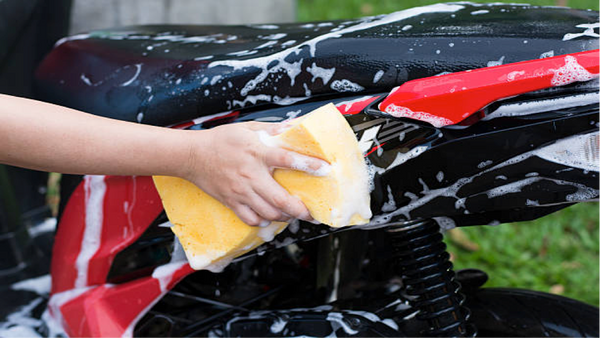
- Sponges- Sponges are great for gently removing dirt and grime from your bike without scratching it. Pro Tip: Rinse your motorcycle first and ensure all surfaces are wet prior to wiping with a sponge, cloth or towel. Also, avoid keeping any sponges, cloth's or towels from lying on the ground. Any one of these materials can easily pick up sand and will significantly increase the odds of scratching your motorcycle the moment you wipe the sponge, cloth or towel on your motorcycle's surface.
- Two Buckets- Yes, two buckets! One bucket should be used specifically for containing hot, clean, soapy water and the second bucket should contain fresh water to help rinse your sponge free from all of the dirt sediments periodically. Pro Tip: Similar to not leaving sponges, cloth's & towels on the ground, you also want to avoid these materials from sitting in a dirty bucket before reusing (which would surely scratch your motorcycle surfaces). The goal is to always have a clean sponge, cloth or towel for every time you wipe your motorcycle.
- Hand Towel- These are one of the best towels to use because they are the perfect size to get the dirty job handled, while not being too large where it would drag onto the ground and collect sand. Also, rememeber to always dampen your clean hand towel before wiping your bike to gently remove the dust and dirt off from your motorcycle's fairing surfaces. Pro Tip: When wiping any motorcycle surface (fairings, windscreen, headlights, rims, etc.), remember not to apply too much pressure, regardless of how stubborn a chunk of dirt may be. If necessary, shower hot soapy water on top of a caked-on piece of dirt and wait for the grease-fighting properties of the soap to slowly disintegrate the dirt from your motorcycle's surface. If the dirt is still caked-on, we recommend laying a hot soapy hand towel on top of the dirty area and let it rest for 5 minutes to help loosen the dirt away.
- Microfiber Cloth- Microfiber towels and cloths are one of the best types of materials to use on your bikes scratch prone surfaces. You can use a microfiber cloth to wash your motorcycle and then use another one when drying off your motorcycle.
- Spray Bottle- A spray bottle is optional, but recommended. It will be used to properly distribute the soap cleaner across your motorcycle in a controlled and targeted manner. The spray bottle is of course to be used in tandem with a hose, your buckets, sponges, cloths and towels!

It’s Washing Time
Start off by showering your bike with water, go over it multiple times to try to take off as much dirt as you can. The less you physically have to touch your bike, the less chances you have of scratching it. Next, you’ll want to grab your spray bottle full of hot, diluted motorcycle soap cleaner or Dawn dish soap. Then begin to spray the soap cleaner all over your motorcycle and let it sit for a couple of minutes to allow any stubborn dirt, grease, grime and gunk to loosen up. Once you feel like you have allowed enough time for the dirt spots to loosen, thoroughly rinse your bike again with water. Now, it's finally time for the sponge. Dip your clean sponge in the hot bucket of water which also contains your soap mixture. Carefully and gently scrub your bike from top to bottom. If the sponge you are using gets dirty in the process, it’s important to rinse it off in the second bucket we mentioned before (or use an entirely new and fresh sponge all together). Remember, scrubbing your bike with a dirty sponge can quickly lead to scratches. Once you are done scrubbing, give your motorcycle a final and thorough fresh water rinse. Pro Tip: Avoid cleaning your bike's chain and brakes to prevent unnecessary stripping of the lubricants that help them function properly!

Drying Your Motorcycle
You’ll want to start drying your motorcycle fairly quickly after the final rinse to avoid water marks and streaking. Simply grab the microfiber towel and get to drying! If you’re feeling ambitious and have a leaf blower at home, feel free to power it up and air dry your motorcycle for a more hands off approach. Once your motorcycle is dried, now would be a good time to re-lube your bike chain. Lastly if you're feeling extra ambitious, you can wax your motorcycle fairings to give it the final sparkle and layer of protection it needs before heading back out onto the road!
The team here at KingsMotorcycleFairings.com hope that you found this article helpful. If you have extra time, we’d love for you to visit our online store for the largest selection of Motorcycle Fairing Kits, Helmets, Gear & Accessories!