News » advice
-
Unleash the Speed: Exploring the World of Fastest Street-Legal Motorcycles
Unleash the Speed: Exploring the World of Fastest Street-Legal Motorcycles by KingsMotorcycleFairings.com

When it comes to pure adrenaline-pumping speed and the thrill of the open road, few experiences can match the exhilaration of riding a motorcycle. For those who crave the fastest and most powerful rides, the world of street-legal motorcycles offers an array of high-performance machines that push the boundaries of speed and engineering. In this blog post, our team at KingsMotorcycleFairings.com invites you to join us on a journey through the realm of the fastest street-legal motorcycles, where raw power meets precision craftsmanship.

Kawasaki Ninja H2R: Unmatched Performance on Two Wheels
At the top of the speed charts, we find the mighty Kawasaki Ninja H2R, a force to be reckoned with. With its supercharged 998cc engine, this beast generates an astonishing 310 horsepower, propelling riders to unimaginable speeds. Featuring aerodynamic design elements and cutting-edge technology, the Ninja H2R is truly a masterpiece of engineering.

Suzuki Hayabusa GSX1300R: The Falcon of Speed
The Suzuki Hayabusa GSX1300R has long been hailed as an icon in the world of speed. Renowned for its aerodynamic design and remarkable power, the Hayabusa dominates the road with its 1340cc inline-four engine. Delivering 197 horsepower and a top speed of over 186 mph, this legendary machine has rightfully earned its place among the fastest street-legal motorcycles.

Ducati Panigale V4R: Italian Mastery in Motion
Hailing from the land of passionate engineering, Ducati presents the Panigale V4R as a testament to Italian craftsmanship and performance. Powered by a 998cc Desmosedici Stradale R engine, this formidable machine produces 221 horsepower, allowing riders to tap into its blistering speed potential. With aerodynamics derived from MotoGP, the Panigale V4R exudes both style and substance.

Yamaha YZF-R1M: Precision meets Power
The Yamaha YZF-R1M is a technological marvel that blends precision engineering with raw power. Equipped with a 998cc inline-four engine, the R1M boasts 200 horsepower and is loaded with advanced electronics and cutting-edge features. Its agile handling and aerodynamic design make it a formidable contender on the road and the racetrack alike.

BMW S1000RR: The Ultimate Driving Machine
BMW has left an indelible mark on the motorcycle world with its S1000RR. Powered by a 999cc inline-four engine, this German masterpiece churns out 205 horsepower, making it one of the fastest bikes on the road. With its dynamic design, exceptional handling, and advanced electronics, the S1000RR offers a truly exhilarating riding experience.
For those who seek the thrill of pushing the limits and feeling the wind rush past, the fastest street-legal motorcycles deliver an unmatched experience. From the raw power of the Kawasaki Ninja H2R to the precision craftsmanship of the BMW S1000RR, these high-performance machines combine cutting-edge technology with impressive speed. While exhilarating, it's important to remember that responsible and safe riding should always be a top priority. So, if you're ready to embrace the speed, put on your helmet, gear up, and embark on an adventure unlike any other!
The Team at KingsMotorCycleFairings.com wishes that you found this article helpful. If you have some extra time, we'd love for you to visit our online store for the largest selection of quality Motorcycle Fairing Kits, Helmets, Boots, Goggles, Backpacks & Accessories!
-
4 Reasons to Love The Kawasaki ZX10R
4 Reasons to Love The Kawasaki ZX10R by KingsMotorcycleFairings.com

When it comes to adrenaline-pumping performance and unmatched power on two wheels, few motorcycles can match the sheer brilliance of the Kawasaki ZX-10R. This legendary superbike has earned a reputation for its exhilarating riding experience and cutting-edge technology. Whether you're a die-hard motorcycle enthusiast or simply appreciate the beauty of engineering marvels, here are four compelling reasons why the Kawasaki ZX-10R deserves your love and admiration.
1. Uncompromising Power: At the heart of the ZX-10R lies a beastly 998cc inline-four engine that delivers mind-blowing power. With a mesmerizing combination of horsepower and torque, this superbike can catapult you from 0 to 60 mph in a matter of seconds. The sheer acceleration and top-end performance of the ZX-10R will leave you breathless, ensuring an unforgettable riding experience every time you twist the throttle.

2. Advanced Technology: Kawasaki has left no stone unturned in equipping the ZX-10R with cutting-edge technology. One of the standout features is the state-of-the-art electronic rider aids that enhance both safety and performance. From advanced traction control and multiple riding modes to quick-shifter systems and launch control, the ZX-10R offers a wide array of electronic wizardry that helps you extract the maximum potential from the machine while keeping you in control.
3. Precision Handling: The Kawasaki ZX-10R is not just about brute force; it's also an exceptional handler. The combination of a lightweight chassis, precise steering, and superb suspension components makes the ZX-10R a dream to maneuver through corners. Whether you're carving through twisty mountain roads or dominating the racetrack, this superbike offers an unmatched level of stability and confidence, allowing you to push your limits and experience the true joy of riding.

4. Striking Design: Beauty lies in the eyes of the beholder, but there's no denying the visual impact of the Kawasaki ZX-10R. With its aggressive and aerodynamic fairings, the ZX-10R demands attention wherever it goes. From its distinctive dual LED headlights to its sharp bodywork and muscular lines, this superbike is a true head-turner. Kawasaki's attention to detail is evident in every inch of the ZX-10R, making it a stunning masterpiece that turns the mundane act of commuting into a captivating visual experience.
The Kawasaki ZX-10R is a superbike that embodies the thrill of speed, the pursuit of perfection, and the joy of riding. With its uncompromising power, advanced technology, precision handling, and striking design, it has rightfully earned its place among the most revered motorcycles in the world. Whether you're a seasoned rider or an aspiring enthusiast, the ZX-10R promises an unparalleled level of excitement and an adrenaline rush like no other. Strap on your helmet, grip those handlebars, and prepare for an adventure of a lifetime aboard the Kawasaki ZX-10R.
The Team at KingsMotorCycleFairings.com wishes that you found this article helpful. If you have some extra time, we'd love for you to visit our online store for the largest selection of quality Motorcycle Fairing Kits, Helmets, Boots, Goggles, Backpacks & Accessories!
-
The Most Common Natural Ways A Motorcycle Can Deteriorate
The Most Common Natural Ways A Motorcycle Can Deteriorate by KingsMotorcycleFairings.com

Motorcycles, beloved by riders around the world, provide an exhilarating and liberating experience on the open road. However, like any machine, motorcycles are subject to deterioration over time. While regular maintenance can extend their lifespan, certain natural factors can contribute to their wear and tear. In this blog, our team at KingsMotorcycleFairings.com will explore some of the most common ways motorcycles deteriorate and discuss how riders can mitigate their impact.
1. Exposure to the Elements: Motorcycles are designed to withstand various weather conditions, but prolonged exposure to the elements can take its toll. Rain, snow, and excessive sunlight can cause rust, fading of fairing paint, and deterioration of rubber components. Regularly cleaning and drying the motorcycle after rides, as well as utilizing protective covers when parked outside, can help mitigate these effects.
2. Corrosion and Rust: As motorcycles age, corrosion and rust become inevitable challenges. Moisture, salt, and chemicals from road surfaces can accelerate this process, particularly in regions with harsh winters or near coastal areas. Regularly inspecting the motorcycle for signs of corrosion and promptly treating affected areas with appropriate rust inhibitors can prevent further damage.

3. Wear and Tear on Moving Parts: Motorcycles consist of numerous moving parts, such as chains, sprockets, and bearings, which experience constant friction and stress during operation. Over time, these components wear out, leading to decreased performance and potential breakdowns. Regular lubrication, tightening, and timely replacement of worn parts are essential for preserving a motorcycle's longevity and safety.
4. Aging Tires: Tires play a vital role in maintaining grip and stability on the road. With time, the rubber compound degrades, reducing traction and compromising safety. Additionally, environmental factors like UV radiation and extreme temperature fluctuations can further accelerate tire aging. Inspecting tire tread depth regularly and replacing them within recommended intervals ensures optimal performance and minimizes the risk of accidents.

5. Deterioration of Electrical Systems: Modern motorcycles incorporate complex electrical systems to power various components, including lights, ignition, and fuel injection systems. Over time, exposure to moisture, dust, and vibration can lead to corroded connectors, loose wiring, and malfunctioning components. Regularly checking and cleaning electrical connections, as well as storing the motorcycle in a dry environment, can help maintain the integrity of the electrical system.
6. Degradation of Fluids: Motorcycles rely on various fluids, such as engine oil, coolant, and brake fluid, for optimal performance and longevity. These fluids degrade over time, losing their lubricating properties and becoming less effective at their respective functions. Regular fluid checks, replacements, and adhering to recommended maintenance schedules ensure proper functioning of vital components and prevent unnecessary wear.
While motorcycles are built to withstand the rigors of the road, natural deterioration is an inevitable part of their lifecycle. By understanding the common factors that contribute to this process, riders can take proactive steps to minimize their impact. Regular maintenance, inspection, and care, coupled with timely repairs and replacements, can extend the lifespan of motorcycles, ensuring they continue to deliver the thrilling experiences riders cherish for years to come. Remember, a well-maintained motorcycle is not only safer but also offers the joy of riding in its purest form.
The Team at KingsMotorCycleFairings.com wishes that you found this article helpful. If you have some extra time, we'd love for you to visit our online store for the largest selection of quality Motorcycle Fairing Kits, Helmets, Boots, Goggles, Backpacks & Accessories!
-
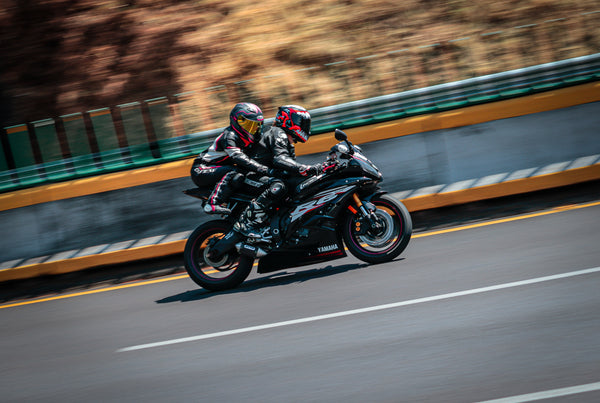
The Ultimate Sport Bike for Two: Unleashing the Thrill of Tandem Riding
The Ultimate Sport Bike for Two: Unleashing the Thrill of Tandem Riding by KingsMotorcycleFairings.com

When it comes to sport bikes, the exhilarating experience of riding solo is undeniable. But what if we told you that the thrill could be shared with a partner? That's right! In this blog post, we'll explore the best sport bike options for two riders, allowing you and your passenger to embark on an unforgettable journey together. From the seamless fusion of power and comfort to the dynamic handling required for tandem riding, KingsMotorcycleFairings.com has got you covered. Let's dive into the world of sport bikes built for two.
1. Yamaha YZF-R6: The Yamaha YZF-R6 is a legendary sport bike known for its superb performance and nimble handling. With its powerful 600cc engine, this bike delivers an adrenaline-pumping experience for both the rider and the passenger. The sleek design and advanced suspension system ensure a comfortable and secure ride, making it an excellent choice for tandem adventures.

2. Suzuki GSX-R1000: Known for its dominance on the track, the Suzuki GSX-R1000 is a force to be reckoned with. This sport bike features a mighty 999cc engine and a lightweight chassis, delivering unmatched power and agility. With its comfortable seating position and excellent suspension system, the GSX-R1000 allows both riders to enjoy a thrilling adventure without compromising on comfort.

3. BMW S1000RR: The BMW S1000RR is a true marvel of engineering, offering a seamless balance between power, precision, and comfort. With its high-performance 999cc engine and advanced electronics, this sport bike provides an adrenaline-fueled experience for both riders. The ergonomics of the S1000RR are optimized for tandem riding, ensuring a smooth and enjoyable journey on any road.

4. Kawasaki Ninja ZX-10R: If speed and agility are your top priorities, look no further than the Kawasaki Ninja ZX-10R. Equipped with a mighty 998cc engine, this sport bike provides an unparalleled burst of power. The ergonomic design and adjustable seating make it suitable for two riders, ensuring a thrilling experience while maintaining stability and control.
Choosing the right sport bike for two riders opens up a world of excitement and shared experiences. Whether you prefer the raw power of the Yamaha YZF-R6, the agility of the Kawasaki Ninja ZX-10R, the precision of the BMW S1000RR, or the dominance of the Suzuki GSX-R1000, KingsMotorcycleFairings.com has the perfect option for you. So gear up, grab your riding partner, and embark on an unforgettable tandem adventure that will leave you both craving for more. Let the exhilaration begin!
The Team at KingsMotorCycleFairings.com wishes that you found this article helpful. If you have some extra time, we'd love for you to visit our online store for the largest selection of quality Motorcycle Fairing Kits, Helmets, Boots, Goggles, Backpacks & Accessories!
-
Revolutionizing Motorcycling: The Creation and Evolution of Honda Motorcycles
Revolutionizing Motorcycling: The Creation and Evolution of Honda Motorcycles by KingsMotorcycleFairings.com

Honda Motorcycles, renowned for their reliability, performance, and innovation, have left an indelible mark on the world of motorcycling. Since their inception, Honda motorcycles have become synonymous with quality and have garnered a loyal following of enthusiasts across the globe. In this blog, our team at KingsMotorcycleFairings.com will dive into the fascinating journey of how Honda motorcycles were created, tracing their humble beginnings to the iconic two-wheeled machines they are today.

The Birth of Honda Motorcycles: The story of Honda motorcycles begins with Soichiro Honda, a visionary entrepreneur and engineer. In 1948, Honda founded the Honda Motor Co., Ltd., with a dream to build and sell motorcycles. Despite limited resources in post-war Japan, Honda's determination and passion for engineering drove him to overcome numerous challenges.
The Super Cub Revolution: In 1958, Honda introduced the Honda Super Cub, a step-through motorcycle that would change the landscape of motorcycling. The Super Cub's user-friendly design, reliability, and fuel efficiency made it an instant success. It became the world's best-selling motor vehicle, surpassing even the mighty Volkswagen Beetle. The Super Cub's impact on mobility and transportation cannot be overstated.
Racing Heritage and Technological Innovations: Honda's entry into motorcycle racing in the 1950s helped solidify its reputation as a manufacturer of high-performance machines. Honda's racing endeavors led to breakthroughs in technology, including the introduction of the four-stroke engine, which replaced the prevalent two-stroke engines of the time. This innovation marked a turning point in the industry, offering increased power, fuel efficiency, and reduced emissions.

Expansion into Global Markets: As Honda motorcycles gained popularity, the company expanded its presence globally. In the 1960s and 1970s, Honda successfully entered the American market, introducing iconic models such as the Honda CB750, a four-cylinder machine that set new standards for performance and reliability. Honda motorcycles quickly gained a strong foothold in various countries, becoming a symbol of freedom and adventure.
Diversification and Technological Advancements: Over the years, Honda diversified its motorcycle lineup to cater to a wide range of riders. From sport bikes to cruisers, off-road machines to scooters, Honda offered something for everyone. The company continued to innovate, incorporating advanced technologies such as fuel injection, ABS braking systems, and electronic rider aids into their motorcycles, enhancing both safety and performance.
Environmental Responsibility: In recent years, Honda has been at the forefront of environmentally friendly motorcycle manufacturing. The company has developed hybrid and electric motorcycles, showcasing their commitment to reducing carbon emissions and promoting sustainability. Honda's efforts align with the global push towards cleaner and greener transportation solutions.
The Future of Honda Motorcycles: Looking ahead, Honda remains dedicated to pushing the boundaries of motorcycle design and technology. With ongoing research in areas such as artificial intelligence, electric mobility, and connectivity, Honda aims to create motorcycles that are not only thrilling to ride but also integrated with smart features that enhance the overall riding experience.
The creation of Honda motorcycles is a testament to the indomitable spirit of Soichiro Honda and his unwavering pursuit of excellence. From the humble beginnings of the Super Cub to the cutting-edge machines of today, Honda has continually redefined the motorcycle industry through innovation, reliability, and a commitment to meeting the evolving needs of riders worldwide. As we ride into the future, we eagerly anticipate the next chapter in the remarkable story of Honda motorcycles.
The Team at KingsMotorCycleFairings.com wishes that you found this article helpful. If you have some extra time, we'd love for you to visit our online store for the largest selection of quality Motorcycle Fairing Kits, Helmets, Boots, Goggles, Backpacks & Accessories!